
The Making of Skyhouse (the building)
|
•Overview •Design •Materials •People •Foundation •Frame •Roof •Strawbales •Plaster •Floor •Heating and Cooling •Interiors •Solar Electric •Water |
Exterior Plaster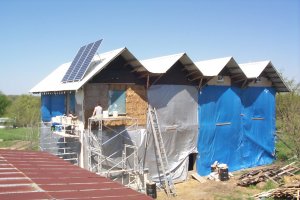 In spring 2002, as soon as the weather warmed up, our first order of business was starting the exterior plaster. So we unveiled parts of the tarped building and set up the scaffold and started mixing it up. Some of our earlier buildings we experimented with an earthen exterior plaster but were unable to find a suitably weatherprrof mix given our driving rains. We are still hopeful but eventually had to coat our earth plasters with a lime finish. So with Skyhouse we decided to follow Kurt's lead on his cottage and do all the exterior plaster in lime, from scratch coat to finish coat (we do stuff voids with clay straw and cob). Using a mix of 6 parts sand to 2 part lime putty to 1 part finely chopped straw we started in on the bales. We've found applying by hand to be a pretty reasonable process, massaging the lime plaster into the bales with gloved hands to get a good adherance. Kurt tried harling his plaster with special harling trowels but now also endorses the massage method. In spring 2002, as soon as the weather warmed up, our first order of business was starting the exterior plaster. So we unveiled parts of the tarped building and set up the scaffold and started mixing it up. Some of our earlier buildings we experimented with an earthen exterior plaster but were unable to find a suitably weatherprrof mix given our driving rains. We are still hopeful but eventually had to coat our earth plasters with a lime finish. So with Skyhouse we decided to follow Kurt's lead on his cottage and do all the exterior plaster in lime, from scratch coat to finish coat (we do stuff voids with clay straw and cob). Using a mix of 6 parts sand to 2 part lime putty to 1 part finely chopped straw we started in on the bales. We've found applying by hand to be a pretty reasonable process, massaging the lime plaster into the bales with gloved hands to get a good adherance. Kurt tried harling his plaster with special harling trowels but now also endorses the massage method.
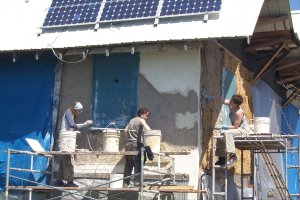 After the scratch coat (which Lindsey is applying on the right) is dry we used a similar mix as the 2nd (infill) coat (which Erin and Jane are applying on the left). The second coat is also applied by hand, saving the trowels for the finish coat. After two coats the building is essentially waterproof and we are then moving on to the next section. Later we will come back and do the finish plaster all at once with a plaster tinted light blue using earth pigments. After that lime washes (also tinted) will no doubt be necessary to cover seems and further weatherproof the plaster. We plan to tint both plaster and wash so that if the wash flakes off you wont see white spots peeking through. After the scratch coat (which Lindsey is applying on the right) is dry we used a similar mix as the 2nd (infill) coat (which Erin and Jane are applying on the left). The second coat is also applied by hand, saving the trowels for the finish coat. After two coats the building is essentially waterproof and we are then moving on to the next section. Later we will come back and do the finish plaster all at once with a plaster tinted light blue using earth pigments. After that lime washes (also tinted) will no doubt be necessary to cover seems and further weatherproof the plaster. We plan to tint both plaster and wash so that if the wash flakes off you wont see white spots peeking through.
People often ask how much plaster costs. For our exterior plaster we estimate its taken about $12 worth of materials to cover 100 sq feet of wall with 2 coats (based on $6 for 50lbs of lime and $14/ton of sand) which means about $600-$1000 for plastering the whole building exterior. Interior PlasterInside we are using an earthen plaster since it can be made of local materials with low embodied energy. Lime is made from limestone heated in a kiln whereas the clay we use comes from digging our own foundations. Our sub-soil is almost 100% clay which is tough for the gardeners but works well for our plasters. After soaking overnight we mix 2 buckets of clay with 6 buckets of sand by stomping it in a tarped plaster pit. We then add 1 bucked of finely shopped straw and this is our standard mix. For our scratch coat we have been experimenting with adding extra clay (as much as another 2 buckets) to give it extra stickyness and workability. This is then forced into the bale by hand or with a trowel. In extra soft spots such as window edges or between bales plaster is worked deep into the bales with fingers probing 1-3 inches into the bales. Voids are stuffed with straw dipped in a very heavy clay slurry, allowing them to fuse with the bales and dry to a hard surface for plastering.On any exposed wood or wheatsheets (particle board made from wheatstraw) we've been stapling burlap and then soaking it with a clay slip (or lime putty/wash on the exterior) and plastering it immediately. So far we have gotten good adhesion with this method which has been a problem on some of our other buildings when plastering over wood. We overlap the burlap a few inches onto the scratch coated plaster to cover the seem between wood and straw which we've found has a tendency to crack as materials expand and contract differently with moisture and temperature changes. The burlap was obtained from a bulk spice importer who had them as surplus and was willing to send them to us for the price of shipping. Much cheaper and more eco than getting them shipped new from Asia. Only drawback is they smell like black pepper! For our finish plaster we sift our sand and clay through a fine meshed hardware cloth and instead of straw add fluff from cattails gathered from our pond last fall. We also add about 1 cup of wheat paste to each bucket of plaster to help prevent dusting (sand falling off the wall when its brushed). The finish coat is applied with rounded trowels and is burnished to a smooth finish when its almost dry. This gives us an attractive and durable finish that can be left in its natural earth tone or painted with a breathable natural paint. Given plasters sculptability we couldn't resist adding niches into our strawbale walls. Cut out with a chainsaw and built up with plaster these niches should be suitable for knicknacks or votive candles. We may even embark on some more substantial sculptures if time allows and inspiration strikes. |