
The Making of Skyhouse (the building)
|
•Overview •Design •Materials •People •Foundation •Frame •Roof •Strawbales •Plaster •Floor •Heating and Cooling •Interiors •Solar Electric •Water |
StrawbalesIn 2001 the bales finaly went in to Skyhouse. Over 1500 wheat straw bales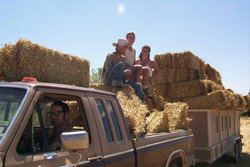 picked up from a neighbors field in 1999 will be used in Skyhouse. We had the straw cut long and the bales packed tight for some truly excellent construction bales. Unfortunately we have lost many of them to weather damage over the years but still had plenty to build with. picked up from a neighbors field in 1999 will be used in Skyhouse. We had the straw cut long and the bales packed tight for some truly excellent construction bales. Unfortunately we have lost many of them to weather damage over the years but still had plenty to build with.
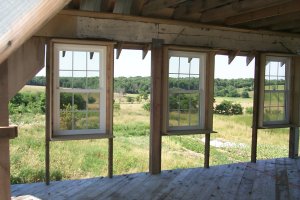 The First step was to build the window bucks. We went with a light weight design with wooden supports rather than floating the bucks in the bale wall. We used wheat sheets (particle board made from wheat straw) as the sides tied in with 2 by 4's. Unfortunately due to the level of compression we used many bucks had their wheatsheets bend and bow (see more below). The First step was to build the window bucks. We went with a light weight design with wooden supports rather than floating the bucks in the bale wall. We used wheat sheets (particle board made from wheat straw) as the sides tied in with 2 by 4's. Unfortunately due to the level of compression we used many bucks had their wheatsheets bend and bow (see more below).
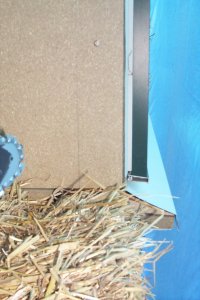 So I wouldnt really recommend our buck design except that we are quite happy with the ability to curve the edges of the windows (see our plaster page) and with the extended drip sill. We found on our other buildings that water running off the windows damages our plaster and decided we didnt want that problem again. So we had some flashing custom bent to create an angled sill that sticks out 3 inches from the window and is framed with a 2 by 4 ripped at an angle. So I wouldnt really recommend our buck design except that we are quite happy with the ability to curve the edges of the windows (see our plaster page) and with the extended drip sill. We found on our other buildings that water running off the windows damages our plaster and decided we didnt want that problem again. So we had some flashing custom bent to create an angled sill that sticks out 3 inches from the window and is framed with a 2 by 4 ripped at an angle.
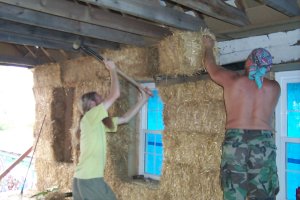
 The next step was to securely tarp the walls to keep the bales dry until plastered. Then we started placing bales. Because of the window bucks and some on the main framing many bales needed to be notched with an electric chainsaw (solar powered of course). But having the main composite posts 18 inches wide meant we could stack each section of the wall separately but did mean some extra half bales. The next step was to securely tarp the walls to keep the bales dry until plastered. Then we started placing bales. Because of the window bucks and some on the main framing many bales needed to be notched with an electric chainsaw (solar powered of course). But having the main composite posts 18 inches wide meant we could stack each section of the wall separately but did mean some extra half bales. 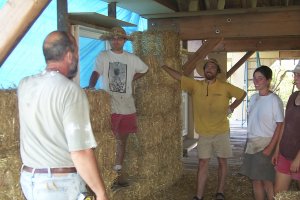 With a crowd of interns the bale stacking went quick. Here Kurt and Tony show folks the ropes. With a crowd of interns the bale stacking went quick. Here Kurt and Tony show folks the ropes.
 Not only did we retie half bales and other custom sized bales, we retied every bale on the window edges. On our two string bales we retied the inside string about 6 inches in from the window and then cut the original wire. This allows us to shape the window edges with a chain saw without danger of hitting wires or cutting strings. It does make the window edges a little squishy requiring an extra vigorous scratch coat of plaster. Not only did we retie half bales and other custom sized bales, we retied every bale on the window edges. On our two string bales we retied the inside string about 6 inches in from the window and then cut the original wire. This allows us to shape the window edges with a chain saw without danger of hitting wires or cutting strings. It does make the window edges a little squishy requiring an extra vigorous scratch coat of plaster.
 Of course not every bale goes in without a little effort. Many took a little persuading with the sledge hammer - sure was great to have Roger and Tom on the site - a former marine and body builder respectively. In addition each wall section was compressed 2-4 inches to get the final row of bales in place. This was no easy process. We planned it to be a 1 inch compression but measuring a bale is not an exact science. The bales were compressed using two hydraulic bottle jacks and a plywood platform. The jacks were pumped up until we had 15 inches of clearance and then 15 inch 2 by 4s were wedged in place. Then a bale could be forced in (often with a sledge) and the platform (covered in plastic for ease of sliding) and wedges removed. The wall could then be hammered back into shape for an amazingly solid wall. It was a pain in the butt but the walls sure are strong with almost no bracing except bamboo driven into the bales from the window bucks. I think a 1-2 inch compression would work great and be much easier. Of course not every bale goes in without a little effort. Many took a little persuading with the sledge hammer - sure was great to have Roger and Tom on the site - a former marine and body builder respectively. In addition each wall section was compressed 2-4 inches to get the final row of bales in place. This was no easy process. We planned it to be a 1 inch compression but measuring a bale is not an exact science. The bales were compressed using two hydraulic bottle jacks and a plywood platform. The jacks were pumped up until we had 15 inches of clearance and then 15 inch 2 by 4s were wedged in place. Then a bale could be forced in (often with a sledge) and the platform (covered in plastic for ease of sliding) and wedges removed. The wall could then be hammered back into shape for an amazingly solid wall. It was a pain in the butt but the walls sure are strong with almost no bracing except bamboo driven into the bales from the window bucks. I think a 1-2 inch compression would work great and be much easier.
|